Must Have Tools For Flawless Wash and Go Results
To have a successful wash and go, your tools matter just as much as your products. Great paint alone doesn’t make an artist’s masterpiece and a killer leave-in conditioner won’t create the style of your dreams on its own. The right tools make the process easier and more fun. When it’s time to approach your hair mid week or at the end of the week, you won’t be avoiding it because you came prepared with the best tools for your wash and go.
The right tools will also help you become more consistent with your wash and go’s and give you the beautiful, healthy hair you admire in all the curly ad campaigns. I will outline below the holy grail tools for wash and go’s that take out the production of styling and kick up the fun in your routine. Let’s get started because you deserve to have flawless hair every time babe.
Detangling Tools
First off you want to consider your desired look. Do you want major definition? Do you want a fluffier look? Are we going for full on round afro? It’s equally important to consider when detangling happens. If you want more definition, detangling belongs in the conditioner phase only (before you apply your leave in conditioner). Keep the end in mind when choosing your tools so that you always land in the right place with your curls.
Wide tooth combs are a common go to because they detangle without dismantling too many curly clumps. The places your hair naturally wants to clump allow for more definition at the end of your style.
Hair type also needs to be considered. If you have lots of strands that don’t clump naturally but you want a more defined wash and go, finger detangling and/or extra wide tooth combs are your friends.
For bigger hair styling detangling brushes are great. They give a thorough detangle by separating more curls. More separation equals bigger hair. You can also use the brush strictly in the conditioner phase and still achieve some definition depending on your curl type.
Keeping the end in mind and knowing at which stage to detangle is key to getting you your desired results.
Suggestions
Kazmaleje Kurls Plus Wide Tooth Comb – I love this wide tooth comb because it’s made with seamless plastic. Essentially meaning the comb is one piece and there are no ridges at the base of each tooth which can be a major snag point on other combs. The teeth are nice and wide making detangling a breeze. I use this tool starting at my ends and then work my way up to the root. The comb is large enough to fully detangle a thick head of hair in 4 to 6 sections quickly.
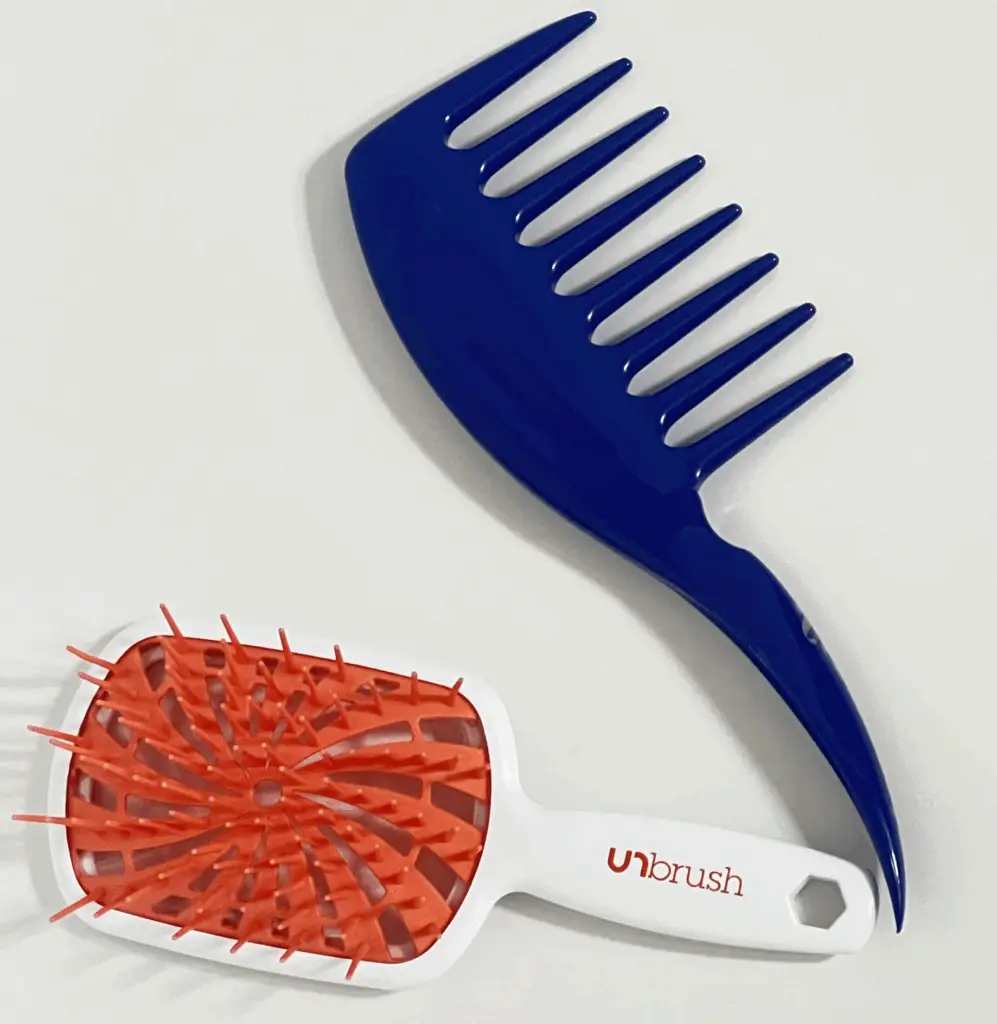
FHI Unbrush Plus – I have an entire blog post dedicated to this brush and for good reason. It’s a master detangler that is super thorough. You also get a nice scalp massage which is a plus when you use this tool.
Spray Bottles and Misting Tools
Spray bottles are a must have in general for all hair types but especially for us curly girls. Depending on your hair texture and porosity, your hair can either soak in water really well or lose it quickly. Spray bottles allow the hair to stay properly moistened to receive your leave in’s and styling products better. Wash and go’s in particular require a lot of water to start so if your hair tends to dry out quickly, get your hands on a spray bottle.
No need for anything fancy. You can repurpose an old spray bottle from another product (wash and/or boil it to remove any old residue) or buy one of my personal favorites which are the continuous misting bottles. These bottles load up water into a separate reservoir and continually mist the hair with water. This is a much more ergonomically friendly option if you hate constantly having to hit the spray trigger on the traditional bottles.
Kit-sch Continuous Mist Spray Bottle – a personal favorite. This holds a good amount of water but also isn’t super bulky. It fits perfectly in carry on’s when traveling and the design and color make this a very aesthetic option if you’re into that sort of thing.
Diffusers
The first thing you need to know about diffusers is that they are not necessary. You can absolutely achieve great results with air drying. But if you don’t want to remain hostage to wet curls, diffusing can be a great way to dry your hair quicker. First off, the settings should be on low speed, high heat. Reason being is you don’t want to disrupt the curls you worked so hard to obtain. Blowing air too fast could wreak havoc on your curls before they’ve had a chance to dry. Start at the roots and work your way gradually around the top, middle and ends of your hair. Continue this order until you reach your desired level of dryness. It’s all about comfort. You could prioritize the roots and let the ends air dry as well.
The good thing about diffusers is that, when used correctly, they help preserve your curl pattern and reduce frizz. The nozzle helps to restrict the air flow and concentrate only on the places you put it. Once your curls are dry you can use your concentration nozzle to shape your hair a bit more.
Pattern diffuser – I love that this comes with the whole kit and kaboodle. You get an amazing dryer with all the attachements including the concentration knozzle for when you want to stretch your hair and shape it.
Diffuser attachments – If you’re not really in the market for a whole new dryer, this one is great because the neck design allows it to attach to almost any dryer.
Edge Tools and Smoothers
For the longest time I did not appreciate the subtle art that is edge laying. It’s not even subtle girl, it’s a down right skill. There is hope for those of us that aren’t as skilled with edge taming and great tools help with that. Coming from someone who used to use a tooth brush for her edges, please hear me when I say that dedicated edge brushes are WAY BETTER. There are a bunch of videos on youtube and the socials to give edge laying tutorials. I keep it simple with one swoop on each side followed by applying a satin scarf around my edges for a few minutes to allow them to form in place. Pair the brush with an edge gel and your edges will be set!
Pattern Edge Tamer Brush – love this because the brush isn’t super stiff. It comes with a built-in comb on the opposite side of the brush and a rat tail end to help with parting.
Bonus: Clips for Sectioning
This is more of a going pro tip however the clips are for speed. When you want to get your hair done quickly, separating your sections will help you cut down your routine. Applying your product in sections isn’t a new concept for natural girls but some of us opt to put our hair in small buns or twists until we reach that section. All of that adds time to the styling process when we could be flying through with good quality clips. Find a clip with a strong spring and the ability to open wide. Larger claw clips made of thicker plastic work great. As long as it can grip the hair well it’s a winner.
Approaching your hair requires much more than products alone but it doesn’t need to be complicated. I’m a fan of finding your favorite tools for wash and go’s as opposed to over consumption and clutter. Simple staples is the name of the game.
Wash and Really Go
I am a wash and go enthusiast helping busy women to master thier curls. I focus on all aspects of the wash and go including cleansing, moisturizing, styling, products and tools to help naturals complete thier hair care routines as quickly as possible while maintaining healthy hair.